CIVITAI / PUBLIC LIBRARY

AI-KSK Civitai Models and Workflows

Search AI-KSK public Civitai models, LoRAs, and workflows with versions, base models, and source links.

385

public entries

23

base model families

60732

total downloads

2512 vs z-image vs flux2
Workflows 2026-01-08

2512 vs z-image vs flux2

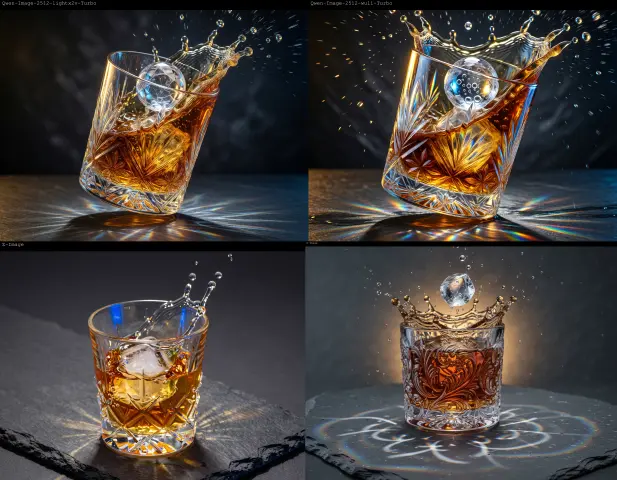
This workflow is a side-by-side benchmark setup: it generates the same prompt at the same resolution through four parallel branches so you can judge differences quickly. The top branches are Qwen-Image-2512 with two different acceleration LoRAs (one explicitly labeled “Lightx2v 4steps LoRA” ), while the other branches run Z-Image and Flux.2 as baselines for realism, prompt adherence, and overall “finish.” In practice, you load the models/accelerators once, write the prompt once, set the image size once, and then run a single generation to get four comparable outputs. The workflow also adds clear labels/captions and saves each result with its own name (for example Qwen-Image-2512 and Flux2 ) so you can archive batches and review them later without confusion. 🎥 YouTube Video Tutorial Want to know what this workflow actually does and how to start fast? This video explains what the tool is, how to launch the workflow instantly, and shares my core design logic — no local setup, no complicated environment. Everything starts directly on RunningHub, so you can experience it in action first. 👉 YouTube Tutorial: https://youtu.be/CTIWLigZL1E Before you begin, I recommend watching the video thoroughly — getting the full context helps you understand the tool faster and avoid common detours. ⚙️ RunningHub Workflow Try the workflow online right now — no installation required. 👉 Workflow: https://www.runninghub.ai/post/2006771390493499393/?inviteCode=rh-v1111 If the results meet your expectations, you can later deploy it locally for customization. 🎁 Fan Benefits: Register to get 1000 points + daily login 100 points — enjoy 4090 performance and 48 GB super power! 📺 Bilibili Updates (Mainland China & Asia-Pacific) If you’re in the Asia-Pacific region, you can watch the video below to see the workflow demonstration and creative breakdown. 📺 Bilibili Video: https://www.bilibili.com/video/BV1s5iqBNE6F/ ☕ Support Me on Ko-fi If you find my content helpful and want to support future creations, you can buy me a coffee ☕. Every bit of support helps me keep creating — just like a spark that can ignite a blazing flame. 👉 Ko-fi: https://ko-fi.com/aiksk 💼 Business Contact For collaboration or inquiries, please contact aiksk95 on WeChat. 🎥 YouTube 视频教程 想了解这个工作流到底是怎样的工具,以及如何快速启动? 视频主要介绍 工具定位、快速启动方法 和 我的构筑思路。 我们会直接在 RunningHub 上进行演示,让你第一时间看到实际效果。 👉 Y

Flux.2 D 133 downloads
View public details
Add Lighting - 2511 Multi-Image Editing
Workflows 2026-01-08

Add Lighting - 2511 Multi-Image Editing

This workflow is the multi-image (up to 3 references) “Add Light & Shadow” pipeline for Qwen-Image-Edit-2511 . It loads the Qwen CLIP/vision encoder, the 2511 BF16 UNet, and the Qwen VAE, then stacks two model-only LoRAs : first the 2511 Lightning 4-step LoRA for fast generation, then your “2511 Add light and shadow to the image” LoRA (set around 0.8 ). The edit instruction is encoded with TextEncodeQwenImageEditPlus , which takes prompt + image1/image2/image3 , so you can do things like “couple in a café” where image1 anchors the main subject, image2 anchors the second person’s look, and image3 is optional. On the sampling side, it keeps the usual Qwen edit setup: it sets the multi-reference latent method to index_timestep_zero , creates an output latent at the target resolution (derived from the input image size), and runs a KSampler in Lightning-style settings (the note recommends 4 steps / CFG 1.0 when Lightning is enabled). The result is decoded via VAE (regular decode or tiled decode for large images), saved, and optionally A/B-compared. Practically, 2511 does the core “multi-image fusion/edit,” and your LoRA pushes the final render to have stronger, more coherent lighting and shadow response across all merged elements, making the composite feel less pasted and more physically grounded. 🎥 YouTube Video Tutorial Want to know what this workflow actually does and how to start fast? This video explains what the tool is, how to launch the workflow instantly, and shares my core design logic — no local setup, no complicated environment. Everything starts directly on RunningHub, so you can experience it in action first. 👉 YouTube Tutorial: https://youtu.be/K33Vs_x7Tuo Before you begin, I recommend watching the video thoroughly — getting the full context helps you understand the tool faster and avoid common detours. ⚙️ RunningHub Workflow Try the workflow online right now — no installation required. 👉 Workflow: https://www.runninghub.ai/post/2005600974947450882/?inviteCode=rh-v1111 If the results meet your expectations, you can later deploy it locally for customization. 🎁 Fan Benefits: Register to get 1000 points + daily login 100 points — enjoy 4090 performance and 48 GB super power! 📺 Bilibili Updates (Mainland China & Asia-Pacific) If you’re in the Asia-Pacific region, you can watch the video below to see the workflow demonstration and c

Qwen 131 downloads
View public details
Megapixel Extreme Upscale
Workflows 2026-01-08

Megapixel Extreme Upscale

This workflow is a “million-pixel” super upscaling pipeline built around SeedVR2 plus a tile-and-assemble stage. It first reads your image, gets its original width/height, and uses simple scaling/resizing nodes to push the image up (there are multiple ImageScaleBy / ImageResize+ steps), then computes a good tile size with TTP_Tile_image_size , splits the image into overlapping tiles with TTP_Image_Tile_Batch , and later reassembles them with TTP_Image_Assy —this is how it keeps memory stable and avoids seams when going extremely high resolution. The actual “quality jump” happens in SeedVR2VideoUpscaler : it takes the prepared image plus the loaded SeedVR2 DiT model and SeedVR2 VAE (both explicitly loaded in the graph), then reconstructs higher-detail tiles that you finally stitch back into a single huge image, preview, and compare A/B against the original with an Image Comparer before saving. In short: resize → tile → SeedVR2 upscale → assemble → compare/save, which is why you can push to ultra-high pixel counts without your GPU exploding. 🎥 YouTube Video Tutorial Want to know what this workflow actually does and how to start fast? This video explains what the tool is, how to launch the workflow instantly, and shares my core design logic — no local setup, no complicated environment. Everything starts directly on RunningHub, so you can experience it in action first. 👉 YouTube Tutorial: https://youtu.be/K33Vs_x7Tuo Before you begin, I recommend watching the video thoroughly — getting the full context helps you understand the tool faster and avoid common detours. ⚙️ RunningHub Workflow Try the workflow online right now — no installation required. 👉 Workflow: https://www.runninghub.ai/post/2005617652724891650/?inviteCode=rh-v1111 If the results meet your expectations, you can later deploy it locally for customization. 🎁 Fan Benefits: Register to get 1000 points + daily login 100 points — enjoy 4090 performance and 48 GB super power! 📺 Bilibili Updates (Mainland China & Asia-Pacific) If you’re in the Asia-Pacific region, you can watch the video below to see the workflow demonstration and creative breakdown. 📺 Bilibili Video: https://www.bilibili.com/video/BV1DgvWBiEMG/ ☕ Support Me on Ko-fi If you find my content helpful and want to support future creations, you can buy me a coffee ☕. Every bit of support helps me keep creating — just l

Other 94 downloads
View public details
Z-Image Text-to-Image
Workflows 2026-01-08

Z-Image Text-to-Image

This workflow is a Z-Image Turbo text-to-image pipeline that’s set up like a clean “one-shot” generator: it loads the Z-Image Turbo UNet ( z_image_turbo_bf16.safetensors ), a shared VAE ( ae.safetensors ), and the Qwen 3 4B text encoder ( qwen_3_4b.safetensors , type qwen_image ). After loading the model, it applies ModelSamplingAuraFlow with a shift value of 3 , which is a sampling tweak used in the official-style example to make the model behave correctly/consistently. From there it’s standard generation: your prompt goes into CLIPTextEncode (positive), a simple negative prompt like “blurry ugly bad” goes into another CLIPTextEncode (negative), and an EmptySD3LatentImage sets the output size (e.g., 1472×1104 ). Then KSampler runs with 9 steps, CFG 1, Euler + Simple scheduler , and the result is VAE-decoded and saved . There’s also a note explaining that the “You are an assistant… ” preamble comes from the official example and is optional—Z-Image will still work if you modify or remove it. 🎥 YouTube Video Tutorial Want to know what this workflow actually does and how to start fast? This video explains what the tool is, how to launch the workflow instantly, and shares my core design logic — no local setup, no complicated environment. Everything starts directly on RunningHub, so you can experience it in action first. 👉 YouTube Tutorial: https://youtu.be/CTIWLigZL1E Before you begin, I recommend watching the video thoroughly — getting the full context helps you understand the tool faster and avoid common detours. ⚙️ RunningHub Workflow Try the workflow online right now — no installation required. 👉 Workflow: https://www.runninghub.ai/post/2007450236398084098/?inviteCode=rh-v1111 If the results meet your expectations, you can later deploy it locally for customization. 🎁 Fan Benefits: Register to get 1000 points + daily login 100 points — enjoy 4090 performance and 48 GB super power! 📺 Bilibili Updates (Mainland China & Asia-Pacific) If you’re in the Asia-Pacific region, you can watch the video below to see the workflow demonstration and creative breakdown. 📺 Bilibili Video: https://www.bilibili.com/video/BV1s5iqBNE6F/ ☕ Support Me on Ko-fi If you find my content helpful and want to support future creations, you can buy me a coffee ☕. Every bit of support helps me keep creating — just like a spark that can ignite a blazing flame. 👉 K

ZImageTurbo 275 downloads
View public details
Flux2-TurboV2 Acceleration
Workflows 2026-01-08

Flux2-TurboV2 Acceleration

This workflow is a Flux.2 Turbo V2 accelerated text-to-image (or optional reference-guided) setup using the ComfyUI “custom sampler” stack instead of the classic KSampler. It loads the Flux2 UNet ( flux2_dev_fp8mixed.safetensors ), the Flux2 text encoder ( mistral_3_small_flux2_fp8… , type flux2 ), and the Flux2 VAE ( flux2-vae.safetensors ). Then it applies a model-only Turbo LoRA ( Flux2TurboComfyv2.safetensors ) at strength 1.0 before sampling, which is the main speed/behavior change in this graph. Sampling is assembled from modular nodes: CLIPTextEncode → FluxGuidance (guidance=4) produces the conditioning, then BasicGuider + KSamplerSelect(euler) + Flux2Scheduler(steps=8) feed into SamplerCustomAdvanced . The base latent comes from EmptyFlux2LatentImage with fixed width/height, and you can optionally enable ReferenceLatent nodes (Ctrl-B) to inject one or more reference images; if you bypass them, it becomes pure text-to-image. Finally the latent is VAE-decoded and saved. In short: Turbo LoRA + custom sampler pipeline, with optional reference-latent anchoring when you want extra similarity control. 🎥 YouTube Video Tutorial Want to know what this workflow actually does and how to start fast? This video explains what the tool is, how to launch the workflow instantly, and shares my core design logic — no local setup, no complicated environment. Everything starts directly on RunningHub, so you can experience it in action first. 👉 YouTube Tutorial: https://youtu.be/CTIWLigZL1E Before you begin, I recommend watching the video thoroughly — getting the full context helps you understand the tool faster and avoid common detours. ⚙️ RunningHub Workflow Try the workflow online right now — no installation required. 👉 Workflow: https://www.runninghub.ai/post/2007448172402057217/?inviteCode=rh-v1111 If the results meet your expectations, you can later deploy it locally for customization. 🎁 Fan Benefits: Register to get 1000 points + daily login 100 points — enjoy 4090 performance and 48 GB super power! 📺 Bilibili Updates (Mainland China & Asia-Pacific) If you’re in the Asia-Pacific region, you can watch the video below to see the workflow demonstration and creative breakdown. 📺 Bilibili Video: https://www.bilibili.com/video/BV1s5iqBNE6F/ ☕ Support Me on Ko-fi If you find my content helpful and want to support future creations, you can buy me a

Flux.2 D 170 downloads
View public details
Qwen-Image-2512-Wuli
Workflows 2026-01-08

Qwen-Image-2512-Wuli

This ComfyUI workflow is a Qwen-Image-2512 text-to-image pipeline accelerated with the Wuli Turbo LoRA (4 steps, v2.0) . It loads the base UNet ( qwen_image_2512_bf16.safetensors ), the Qwen text encoder/CLIP ( qwen_2.5_vl_7b_fp8_scaled.safetensors , type qwen_image ), and the VAE ( qwen_image_vae.safetensors ), then applies LoraLoaderModelOnly with Wuli-Qwen-Image-2512-Turbo-LoRA-4steps-V2.0-bf16 at strength 1.0 . Generation is done from an EmptySD3LatentImage (here set to 1472×1104 ) and a KSampler configured for 4-step, low-CFG fast sampling (steps=4, cfg=1, sampler= euler , scheduler= simple , denoise=1). The positive prompt is encoded by the Positive CLIPTextEncode , the negative prompt is encoded by the Negative CLIPTextEncode , the sampled latent is VAE-decoded , and the final image is saved with a clear prefix (e.g., “Qwen-Image-2512”) so you can batch-test and compare outputs easily. 🎥 YouTube Video Tutorial Want to know what this workflow actually does and how to start fast? This video explains what the tool is, how to launch the workflow instantly, and shares my core design logic — no local setup, no complicated environment. Everything starts directly on RunningHub, so you can experience it in action first. 👉 YouTube Tutorial: https://youtu.be/CTIWLigZL1E Before you begin, I recommend watching the video thoroughly — getting the full context helps you understand the tool faster and avoid common detours. ⚙️ RunningHub Workflow Try the workflow online right now — no installation required. 👉 Workflow: https://www.runninghub.ai/post/2007448165187854338/?inviteCode=rh-v1111 If the results meet your expectations, you can later deploy it locally for customization. 🎁 Fan Benefits: Register to get 1000 points + daily login 100 points — enjoy 4090 performance and 48 GB super power! 📺 Bilibili Updates (Mainland China & Asia-Pacific) If you’re in the Asia-Pacific region, you can watch the video below to see the workflow demonstration and creative breakdown. 📺 Bilibili Video: https://www.bilibili.com/video/BV1s5iqBNE6F/ ☕ Support Me on Ko-fi If you find my content helpful and want to support future creations, you can buy me a coffee ☕. Every bit of support helps me keep creating — just like a spark that can ignite a blazing flame. 👉 Ko-fi: https://ko-fi.com/aiksk 💼 Business Contact For collaboration or inquiries, please contact

Qwen 136 downloads
View public details
Add Lighting - 2511 Single Image Editing (Anti-Drift)
Workflows 2026-01-08

Add Lighting - 2511 Single Image Editing (Anti-Drift)

This workflow is the “Add Light & Shadow” LoRA version of the Qwen-Image-Edit-2511 anti-drift single-image edit pipeline . It loads the Qwen CLIP/vision encoder, the 2511 BF16 UNet, and the Qwen VAE, then stacks two model-only LoRAs: first the 2511 Lightning 4-step LoRA for fast, stable sampling, and then your “Add light and shadow to the image” LoRA to强化 the relighting effect. The positive prompt is literally set to “Add light and shadow to the image” , so you can drop this LoRA into any 2511 workflow and trigger the look with a simple phrase. The “anti-drift” part comes from using ReferenceLatent : the pipeline VAE-encodes the (scaled) input image into latent space, then injects that latent back into both positive and negative conditioning so the sampler keeps the original composition locked while it adds stronger lighting/shadow cues. It samples with Lightning-style settings (the note recommends 4 steps / CFG 1.0 when Lightning is enabled), then decodes with VAE (regular or tiled decode) and includes an A/B image comparer to check the before/after lighting change. 🎥 YouTube Video Tutorial Want to know what this workflow actually does and how to start fast? This video explains what the tool is, how to launch the workflow instantly, and shares my core design logic — no local setup, no complicated environment. Everything starts directly on RunningHub, so you can experience it in action first. 👉 YouTube Tutorial: https://youtu.be/K33Vs_x7Tuo Before you begin, I recommend watching the video thoroughly — getting the full context helps you understand the tool faster and avoid common detours. ⚙️ RunningHub Workflow Try the workflow online right now — no installation required. 👉 Workflow: https://www.runninghub.ai/post/2005600933931352066/?inviteCode=rh-v1111 If the results meet your expectations, you can later deploy it locally for customization. 🎁 Fan Benefits: Register to get 1000 points + daily login 100 points — enjoy 4090 performance and 48 GB super power! 📺 Bilibili Updates (Mainland China & Asia-Pacific) If you’re in the Asia-Pacific region, you can watch the video below to see the workflow demonstration and creative breakdown. 📺 Bilibili Video: https://www.bilibili.com/video/BV1DgvWBiEMG/ ☕ Support Me on Ko-fi If you find my content helpful and want to support future creations, you can buy me a coffee ☕. Every bit of support hel

Qwen 87 downloads
View public details
Qwen-Image-2512-lightx2v
Workflows 2026-01-08

Qwen-Image-2512-lightx2v

This ComfyUI workflow is a Qwen-Image-2512 text-to-image pipeline accelerated by the Lightx2v “Lightning 4-steps” LoRA . It loads the core components— UNet ( qwen_image_2512_bf16.safetensors ), text encoder/CLIP ( qwen_2.5_vl_7b_fp8_scaled.safetensors , type qwen_image ), and the VAE ( qwen_image_vae.safetensors )—then applies a model-only LoRA via LoraLoaderModelOnly using the Lightx2v 4-step checkpoint ( Qwen-Image-Edit-2512-Lightning-4steps-V1.0-bf16.safetensors ) at strength 1.0. Generation is done with an EmptySD3LatentImage (e.g., 1472×1104) and a KSampler configured for ultra-fast 4-step sampling (steps=4, cfg=1, sampler= euler , scheduler= simple , denoise=1). Your positive prompt text is fed into the Positive CLIPTextEncode , while the Negative CLIPTextEncode holds a “quality control” negative prompt; the sampled latent is then VAE-decoded and saved . In practice, you mainly tweak: prompt text, resolution, seed/randomize, and (rarely) CFG—this workflow is intentionally tuned so Lightx2v stays stable at 4 steps for fast output. 🎥 YouTube Video Tutorial Want to know what this workflow actually does and how to start fast? This video explains what the tool is, how to launch the workflow instantly, and shares my core design logic — no local setup, no complicated environment. Everything starts directly on RunningHub, so you can experience it in action first. 👉 YouTube Tutorial: https://youtu.be/CTIWLigZL1E Before you begin, I recommend watching the video thoroughly — getting the full context helps you understand the tool faster and avoid common detours. ⚙️ RunningHub Workflow Try the workflow online right now — no installation required. 👉 Workflow: https://www.runninghub.ai/post/2007448158065922050/?inviteCode=rh-v1111 If the results meet your expectations, you can later deploy it locally for customization. 🎁 Fan Benefits: Register to get 1000 points + daily login 100 points — enjoy 4090 performance and 48 GB super power! 📺 Bilibili Updates (Mainland China & Asia-Pacific) If you’re in the Asia-Pacific region, you can watch the video below to see the workflow demonstration and creative breakdown. 📺 Bilibili Video: https://www.bilibili.com/video/BV1s5iqBNE6F/ ☕ Support Me on Ko-fi If you find my content helpful and want to support future creations, you can buy me a coffee ☕. Every bit of support helps me keep creating — just like

Qwen 138 downloads
View public details
Qwen-Image-Edit-2511 Single Image Editing (Anti-Drift)
Workflows 2026-01-07

Qwen-Image-Edit-2511 Single Image Editing (Anti-Drift)

This ComfyUI workflow is a single-image “anti-drift” edit setup for Qwen-Image-Edit-2511 . You input a main image (as the anchor) plus a text instruction, and it can also take up to 3 reference images (image1/2/3) through the Qwen Image Edit encoder—typically you put the most important identity/detail in image1 , and use image2/3 only as extra guidance. The key idea is how it stabilizes composition : it encodes the input image into latent space and then injects that latent as a reference inside the conditioning path , so the model keeps “locking onto” the original structure instead of subtly shifting pixels. It’s paired with a Lightning 4-step LoRA and a fast sampling setup (4 steps, low CFG) to get quick edits while staying consistent. 🎥 YouTube Video Tutorial Want to know what this workflow actually does and how to start fast? This video explains what the tool is, how to launch the workflow instantly, and shares my core design logic — no local setup, no complicated environment. Everything starts directly on RunningHub, so you can experience it in action first. 👉 YouTube Tutorial: https://youtu.be/8gpnO-0tJj8 Before you begin, I recommend watching the video thoroughly — getting the full context helps you understand the tool faster and avoid common detours. ⚙️ RunningHub Workflow Try the workflow online right now — no installation required. 👉 Workflow: https://www.runninghub.ai/post/2004187504674828289/?inviteCode=rh-v1111 If the results meet your expectations, you can later deploy it locally for customization. 🎁 Fan Benefits: Register to get 1000 points + daily login 100 points — enjoy 4090 performance and 48 GB super power! 📺 Bilibili Updates (Mainland China & Asia-Pacific) If you’re in the Asia-Pacific region, you can watch the video below to see the workflow demonstration and creative breakdown. 📺 Bilibili Video: https://www.bilibili.com/video/BV1RHBRBgEo7/ ☕ Support Me on Ko-fi If you find my content helpful and want to support future creations, you can buy me a coffee ☕. Every bit of support helps me keep creating — just like a spark that can ignite a blazing flame. 👉 Ko-fi: https://ko-fi.com/aiksk 💼 Business Contact For collaboration or inquiries, please contact aiksk95 on WeChat. 🎥 YouTube 视频教程 想了解这个工作流到底是怎样的工具,以及如何快速启动? 视频主要介绍 工具定位、快速启动方法 和 我的构筑思路。 我们会直接在 RunningHub 上进行演示,让你第一时间看到实际效果。 👉 YouTube 教程: https://yo

Qwen 626 downloads
View public details
Workflows 2026-01-07

Wan2.2-Stand-in Face Consistency

This Wan2.2 Stand-in workflow is built to lock a character’s identity (especially the face) while still letting Wan2.2 generate motion and the rest of the scene normally. It does that by running your reference image through the Stand-In preprocessor (“FaceProcessorLoader” + “ApplyFaceProcessor”), with options like with_neck and face_only_mode to control how much of the head/neck region is treated as the identity anchor. Once the face features are extracted and injected into the generation path, the model is much more likely to keep the same person across frames instead of “drifting” into a look-alike. On the Wan2.2 side, the workflow pairs that identity anchor with two dedicated LoRAs (HIGH + LOW) so the model follows the reference consistently throughout the diffusion process, rather than only at one stage. In practice, you mainly swap the input reference image to change the person, and then adjust how strict the identity lock feels by choosing whether you keep it face-only or include the neck/hair region—face-only is cleaner for “just keep the face,” while including more area tends to hold hairstyle/head silhouette better when motion gets stronger. 🎥 YouTube Video Tutorial Want to know what this workflow actually does and how to start fast? This video explains what the tool is, how to launch the workflow instantly, and shares my core design logic — no local setup, no complicated environment. Everything starts directly on RunningHub, so you can experience it in action first. 👉 YouTube Tutorial: https://youtu.be/mfQVh9oXByQ Before you begin, I recommend watching the video thoroughly — getting the full context helps you understand the tool faster and avoid common detours. ⚙️ RunningHub Workflow Try the workflow online right now — no installation required. 👉 Workflow: https://www.runninghub.ai/post/2004807715740413953/?inviteCode=rh-v1111 If the results meet your expectations, you can later deploy it locally for customization. 🎁 Fan Benefits: Register to get 1000 points + daily login 100 points — enjoy 4090 performance and 48 GB super power! 📺 Bilibili Updates (Mainland China & Asia-Pacific) If you’re in the Asia-Pacific region, you can watch the video below to see the workflow demonstration and creative breakdown. 📺 Bilibili Video: https://www.bilibili.com/video/BV1uiviBME4g/ ☕ Support Me on Ko-fi If you find my content helpful and w

Qwen 852 downloads
View public details
Qwen-Image-Edit-2511 Multi-Image Editing
Workflows 2026-01-07

Qwen-Image-Edit-2511 Multi-Image Editing

This workflow is a multi-image edit/composition pipeline for Qwen-Image-Edit-2511 . It loads the Qwen CLIP/vision encoder, the 2511 UNet, and the Qwen VAE, then (optionally) applies the Qwen-Image-Edit-2511 Lightning 4-step LoRA to run fast. You provide up to three reference images (image1/2/3) plus a text instruction (e.g. “a group photo of the three people”), and the node TextEncodeQwenImageEditPlus turns “text + images” into the conditioning the model will follow. From there, the workflow sets the multi-reference latent method to index_timestep_zero , builds an empty latent at the target width/height (derived from the input image size), and runs a KSampler with a Lightning-style fast configuration (the included note recommends 4 steps / CFG 1.0 when Lightning is enabled). The result is decoded through the VAE (regular decode or tiled decode), then saved (with an optional A/B compare node). In practical use, you treat image1 as the strongest anchor (identity/detail you care about most), and image2/3 as supporting references for secondary elements. 🎥 YouTube Video Tutorial Want to know what this workflow actually does and how to start fast? This video explains what the tool is, how to launch the workflow instantly, and shares my core design logic — no local setup, no complicated environment. Everything starts directly on RunningHub, so you can experience it in action first. 👉 YouTube Tutorial: https://youtu.be/8gpnO-0tJj8 Before you begin, I recommend watching the video thoroughly — getting the full context helps you understand the tool faster and avoid common detours. ⚙️ RunningHub Workflow Try the workflow online right now — no installation required. 👉 Workflow: https://www.runninghub.ai/post/2004187543652499458/?inviteCode=rh-v1111 If the results meet your expectations, you can later deploy it locally for customization. 🎁 Fan Benefits: Register to get 1000 points + daily login 100 points — enjoy 4090 performance and 48 GB super power! 📺 Bilibili Updates (Mainland China & Asia-Pacific) If you’re in the Asia-Pacific region, you can watch the video below to see the workflow demonstration and creative breakdown. 📺 Bilibili Video: https://www.bilibili.com/video/BV1RHBRBgEo7/ ☕ Support Me on Ko-fi If you find my content helpful and want to support future creations, you can buy me a coffee ☕. Every bit of support helps me keep creatin

Qwen 606 downloads
View public details
Qwen-Image-Edit-2511 Single Image Editing (Divergent)
Workflows 2026-01-07

Qwen-Image-Edit-2511 Single Image Editing (Divergent)

This “divergent” single-image workflow is the official-style Qwen-Image-Edit-2511 pipeline that behaves more generative and flexible . It loads the Qwen CLIP/vision encoder, the 2511 UNet, and the Qwen VAE, then optionally applies the Lightning 4-step LoRA for fast sampling. You feed an input image plus your text prompt, and the encoder can also accept up to three reference images (image1/2/3) to guide identity, objects, or context. It’s called “divergent” because the conditioning is built in a way that lets the model re-compose the image more freely , so it’s great for “rewrite the scene” edits but more likely to shift framing/details than an anti-drift setup. In this workflow you typically put the most important content in image1 (the strongest anchor) and use image2/3 as supporting references; then you run a low-step/low-CFG configuration when Lightning is enabled (the workflow’s notes suggest 4 steps / CFG 1.0 for Lightning). 🎥 YouTube Video Tutorial Want to know what this workflow actually does and how to start fast? This video explains what the tool is, how to launch the workflow instantly, and shares my core design logic — no local setup, no complicated environment. Everything starts directly on RunningHub, so you can experience it in action first. 👉 YouTube Tutorial: https://youtu.be/8gpnO-0tJj8 Before you begin, I recommend watching the video thoroughly — getting the full context helps you understand the tool faster and avoid common detours. ⚙️ RunningHub Workflow Try the workflow online right now — no installation required. 👉 Workflow: https://www.runninghub.ai/post/2004187516678926338/?inviteCode=rh-v1111 If the results meet your expectations, you can later deploy it locally for customization. 🎁 Fan Benefits: Register to get 1000 points + daily login 100 points — enjoy 4090 performance and 48 GB super power! 📺 Bilibili Updates (Mainland China & Asia-Pacific) If you’re in the Asia-Pacific region, you can watch the video below to see the workflow demonstration and creative breakdown. 📺 Bilibili Video: https://www.bilibili.com/video/BV1RHBRBgEo7/ ☕ Support Me on Ko-fi If you find my content helpful and want to support future creations, you can buy me a coffee ☕. Every bit of support helps me keep creating — just like a spark that can ignite a blazing flame. 👉 Ko-fi: https://ko-fi.com/aiksk 💼 Business Contact For colla

Qwen 233 downloads
View public details
Qwen-Image-Edit-2511 Skeleton Guidance Editing
Workflows 2026-01-07

Qwen-Image-Edit-2511 Skeleton Guidance Editing

This workflow is a skeleton/pose-guided edit pipeline for Qwen-Image-Edit-2511 : it loads the Qwen CLIP/vision encoder + 2511 UNet + Qwen VAE, optionally applies the Lightning 4-step LoRA , then takes image1 as the identity/appearance anchor and image2 as the pose source . The pose is extracted with SDPose OOD (WholeBody) and fed back into the edit-conditioning so the final result follows image2’s body structure while keeping image1’s character; the prompt is written like “use image2’s pose for image1” (your file literally uses that idea). After conditioning is built, it sets the multi-reference latent method to index_timestep_zero , creates an empty latent at the target width/height, encodes the anchor image into latent space (VAEEncode) , and runs KSampler (Lightning-style fast settings are shown in the note: low steps / low CFG). The output is decoded (regular or tiled VAE decode), previewed/compared, and saved; there’s also a PurgeVRAM utility node to clear memory when switching heavy models. 🎥 YouTube Video Tutorial Want to know what this workflow actually does and how to start fast? This video explains what the tool is, how to launch the workflow instantly, and shares my core design logic — no local setup, no complicated environment. Everything starts directly on RunningHub, so you can experience it in action first. 👉 YouTube Tutorial: https://youtu.be/8gpnO-0tJj8 Before you begin, I recommend watching the video thoroughly — getting the full context helps you understand the tool faster and avoid common detours. ⚙️ RunningHub Workflow Try the workflow online right now — no installation required. 👉 Workflow: https://www.runninghub.ai/post/2004190125385019394/?inviteCode=rh-v1111 If the results meet your expectations, you can later deploy it locally for customization. 🎁 Fan Benefits: Register to get 1000 points + daily login 100 points — enjoy 4090 performance and 48 GB super power! 📺 Bilibili Updates (Mainland China & Asia-Pacific) If you’re in the Asia-Pacific region, you can watch the video below to see the workflow demonstration and creative breakdown. 📺 Bilibili Video: https://www.bilibili.com/video/BV1RHBRBgEo7/ ☕ Support Me on Ko-fi If you find my content helpful and want to support future creations, you can buy me a coffee ☕. Every bit of support helps me keep creating — just like a spark that can ignite a blazing flame.

Qwen 200 downloads
View public details
Qwen-Image-Edit-2511 2509 LoRA Test
Workflows 2026-01-07

Qwen-Image-Edit-2511 2509 LoRA Test

This workflow is essentially a compatibility + performance test : it loads Qwen-Image-Edit-2511 (BF16) as the base editing model, then applies the older LightX2V “Qwen-Image-Edit-2509 Lightning 4steps” LoRA in a model-only way to see whether that 2509 acceleration LoRA still behaves correctly on top of 2511. The goal is to keep the usual “image-as-reference + prompt-as-instruction” editing behavior, while checking if the 4-step LoRA still gives you faster convergence (and sometimes cleaner results) without breaking similarity or introducing weird artifacts. In practice, you use it like an A/B switch: dial the 2509 Lightning LoRA strength up/down (or disable it) and compare outputs for stability, detail retention, and unwanted drift. If you notice instability, you can either reduce the LoRA strength or switch to the 2511-specific Lightning 4steps LoRA that’s also referenced in the workflow, which is the safer “native” accelerated path for 2511. 🎥 YouTube Video Tutorial Want to know what this workflow actually does and how to start fast? This video explains what the tool is, how to launch the workflow instantly, and shares my core design logic — no local setup, no complicated environment. Everything starts directly on RunningHub, so you can experience it in action first. 👉 YouTube Tutorial: https://youtu.be/8gpnO-0tJj8 Before you begin, I recommend watching the video thoroughly — getting the full context helps you understand the tool faster and avoid common detours. ⚙️ RunningHub Workflow Try the workflow online right now — no installation required. 👉 Workflow: https://www.runninghub.ai/post/2004203833310019585/?inviteCode=rh-v1111 If the results meet your expectations, you can later deploy it locally for customization. 🎁 Fan Benefits: Register to get 1000 points + daily login 100 points — enjoy 4090 performance and 48 GB super power! 📺 Bilibili Updates (Mainland China & Asia-Pacific) If you’re in the Asia-Pacific region, you can watch the video below to see the workflow demonstration and creative breakdown. 📺 Bilibili Video: https://www.bilibili.com/video/BV1RHBRBgEo7/ ☕ Support Me on Ko-fi If you find my content helpful and want to support future creations, you can buy me a coffee ☕. Every bit of support helps me keep creating — just like a spark that can ignite a blazing flame. 👉 Ko-fi: https://ko-fi.com/aiksk 💼 Business Cont

Qwen 90 downloads
View public details
[KSK-2511Lora]Add light and shadow to the image
LORA 2026-01-01

[KSK-2511Lora]Add light and shadow to the image

【Introduction】 Welcome to the "Ultimate Light & Shadow" LoRA, specifically trained for the 2511 Image Editing Architecture. This is not just a simple filter; it is the core lighting enhancement for your local workflows. In the realm of image fusion and editing, light and shadow are the defining factors of realism. This model goes beyond the limitations of standard lighting models. It doesn't just add a light source; it deeply understands the physical law that "where there is light, there must be shadow," delivering cinematic texture and profound depth to your generations. 【Core Features】 Depth Perception: Surpassing simple brightness adjustments, this LoRA focuses on constructing the contrast between light and shadow. It precisely calculates light source directionality, automatically generating logical shadows and reflections. Seamless Fusion: Whether it's object insertion, background replacement (Inpainting/Outpainting), or multi-image composition, it ensures absolute lighting unity between the subject and the environment, eliminating the "cut-and-paste" look. Full Workflow Compatibility: Perfectly adapted for both Reference Latent (Anti-shift) and Direct VAE (High-speed) workflows within ComfyUI. 【Usage】 Simply load this LoRA into your 2511 ComfyUI workflow. By using simple prompt descriptions (Trigger Words) to define the lighting atmosphere (e.g., "cinematic lighting", "shadows on the ground", "rim light"), you can instantly activate its effects. 【Showcase Scenarios】 Texture Enhancement: Transform ordinary still life renders (like products, watches) into commercial studio-quality shots with maxed-out metallic and material reflection details. Complex Environment Blending: Even in extreme surreal backgrounds, it locks the subject's lighting to the environment perfectly. Multi-Image Editing: In dual-subject photos or complex scenes, it orchestrates the light source direction for all elements, achieving a flawless scene reconstruction. 【RunningHub Workflow】 Try the workflow online right now — no installation required. 👉 Workflow Links: Add Light & Shadow - 2511 Single Image (Anti-shift): https://www.runninghub.ai/post/2005600933931352066/?inviteCode=rh-v1111 Add Light & Shadow - 2511 Single Image (Divergent): https://www.runninghub.ai/post/2005600964696571906/?inviteCode=rh-v1111 Add Light & Shadow - 2511 Multi-Image: https://www.runningh

Qwen 682 downloads
View public details
Z-Image-Controlnet-2.1-8-step local inpainting+lora face fix & paste-back+upscale
Workflows 2025-12-25

Z-Image-Controlnet-2.1-8-step local inpainting+lora face fix & paste-back+upscale

This workflow utilizes the ComfyUI platform to improve image generation and facial detail refinement. The new 2.1 CN model with 8 steps reduces the number of required steps, enhancing efficiency, especially for facial details. Facial areas are selectively inpainted to match the Lora model, using masks and pre-processed images for precise adjustments. The image is upscaled based on the longest edge, focusing on facial features to improve consistency with the Lora model. After refinement, the enhanced facial area is reintegrated into the original image, ensuring overall consistency. This process is perfect for adjusting facial features and improving alignment with character models. 🎥 YouTube Video Tutorial Want to know what this workflow actually does and how to start fast? This video explains what the tool is, how to launch the workflow instantly, and shares my core design logic — no local setup, no complicated environment. Everything starts directly on RunningHub, so you can experience it in action first. 👉 YouTube Tutorial: https://youtu.be/NzMIK3p3aKM Before you begin, I recommend watching the video thoroughly — getting the full context helps you understand the tool faster and avoid common detours. ⚙️ RunningHub Workflow Try the workflow online right now — no installation required. 👉 Workflow: https://www.runninghub.ai/post/2003151044785897473/?inviteCode=rh-v1111 If the results meet your expectations, you can later deploy it locally for customization. 🎁 Fan Benefits: Register to get 1000 points + daily login 100 points — enjoy 4090 performance and 48 GB super power! 📺 Bilibili Updates (Mainland China & Asia-Pacific) If you’re in the Asia-Pacific region, you can watch the video below to see the workflow demonstration and creative breakdown. 📺 Bilibili Video: https://www.bilibili.com/video/BV1iEBuB1EbB/ ☕ Support Me on Ko-fi If you find my content helpful and want to support future creations, you can buy me a coffee ☕. Every bit of support helps me keep creating — just like a spark that can ignite a blazing flame. 👉 Ko-fi: https://ko-fi.com/aiksk 💼 Business Contact For collaboration or inquiries, please contact aiksk95 on WeChat. 🎥 YouTube 视频教程 想了解这个工作流到底是怎样的工具,以及如何快速启动?视频主要介绍工具定位、快速启动方法和我的构筑思路。我们会直接在 RunningHub 上进行演示,让你第一时间看到实际效果。 👉 YouTube 教程: https://youtu.be/NzMIK3p3aKM 开始前建议尽量完整地观看视频 —— 把握整体思路会更快上手,也能少走常见弯路。 ⚙️ 在线体验工作流 现在就可以在线体验,无

ZImageTurbo 421 downloads
View public details
Workflows 2025-12-25

LongCat-Video-Avatar digital human image-to-video long video

This workflow generates a long-form talking avatar video by combining an input image with an audio track. It uses the LongCat-Avatar model to animate a static character, synchronizing lip movements and expressions to the provided audio. The system processes the video in sequential, overlapping chunks to ensure smooth, continuous animation over extended durations. To use it, you provide a reference image of the character and a source audio file, which is first processed to isolate vocals. The core of the workflow is an iterative loop where each generated segment informs the next, creating a seamless, long-form video. This makes it particularly effective for producing continuous talking-head-style content where maintaining character and motion consistency is key. 🎥 YouTube Video Tutorial Want to know what this workflow actually does and how to start fast? This video explains what the tool is, how to launch the workflow instantly, and shares my core design logic — no local setup, no complicated environment. Everything starts directly on RunningHub, so you can experience it in action first. 👉 YouTube Tutorial: https://youtu.be/nga34VtsZuA Before you begin, I recommend watching the video thoroughly — getting the full context helps you understand the tool faster and avoid common detours. ⚙️ RunningHub Workflow Try the workflow online right now — no installation required. 👉 Workflow: https://www.runninghub.ai/post/2003091574424764418/?inviteCode=rh-v1111 If the results meet your expectations, you can later deploy it locally for customization. 🎁 Fan Benefits: Register to get 1000 points + daily login 100 points — enjoy 4090 performance and 48 GB super power! 📺 Bilibili Updates (Mainland China & Asia-Pacific) If you’re in the Asia-Pacific region, you can watch the video below to see the workflow demonstration and creative breakdown. 📺 Bilibili Video: https://www.bilibili.com/video/BV1H5BsBeEgx/ ☕ Support Me on Ko-fi If you find my content helpful and want to support future creations, you can buy me a coffee ☕. Every bit of support helps me keep creating — just like a spark that can ignite a blazing flame. 👉 Ko-fi: https://ko-fi.com/aiksk 💼 Business Contact For collaboration or inquiries, please contact aiksk95 on WeChat. 🎥 YouTube 视频教程 想了解这个工作流到底是怎样的工具,以及如何快速启动?视频主要介绍工具定位、快速启动方法和我的构筑思路。我们会直接在 RunningHub 上进行演示,让你第一时间看到实际效果。 👉 YouTube 教程: https:/

Wan Video 14B i2v 720p 291 downloads
View public details
Z-Image-Controlnet-2.1-8-step text-to-image+lora face fix & paste-back+upscale
Workflows 2025-12-25

Z-Image-Controlnet-2.1-8-step text-to-image+lora face fix & paste-back+upscale

This workflow enhances local inpainting for the Z-Image model by using a two-stage rendering process to improve character consistency, especially in challenging scenarios like small faces in a large frame. In the first "high-noise" pass, ControlNet 2.1 guides the overall structure while a character LoRA at low strength establishes the foundational facial features. The second "low-noise" pass increases the LoRA's strength to full to accurately restore the character's identity, bypassing ControlNet to allow for finer aesthetic refinement. To use this, you provide an image and mask the region for inpainting. The workflow also supports two upscaling options for the final output: a diffusion-based tiled upscaler (TTP) and SeedVR2, which offers a more faithful, high-resolution enlargement. This dual-pass approach balances strong structural control with high-fidelity detail, making it effective for complex inpainting tasks. 🎥 YouTube Video Tutorial Want to know what this workflow actually does and how to start fast? This video explains what the tool is, how to launch the workflow instantly, and shares my core design logic — no local setup, no complicated environment. Everything starts directly on RunningHub, so you can experience it in action first. 👉 YouTube Tutorial: https://youtu.be/NzMIK3p3aKM Before you begin, I recommend watching the video thoroughly — getting the full context helps you understand the tool faster and avoid common detours. ⚙️ RunningHub Workflow Try the workflow online right now — no installation required. 👉 Workflow: https://www.runninghub.ai/post/2003343268333092866/?inviteCode=rh-v1111 If the results meet your expectations, you can later deploy it locally for customization. 🎁 Fan Benefits: Register to get 1000 points + daily login 100 points — enjoy 4090 performance and 48 GB super power! 📺 Bilibili Updates (Mainland China & Asia-Pacific) If you’re in the Asia-Pacific region, you can watch the video below to see the workflow demonstration and creative breakdown. 📺 Bilibili Video: https://www.bilibili.com/video/BV1iEBuB1EbB/ ☕ Support Me on Ko-fi If you find my content helpful and want to support future creations, you can buy me a coffee ☕. Every bit of support helps me keep creating — just like a spark that can ignite a blazing flame. 👉 Ko-fi: https://ko-fi.com/aiksk 💼 Business Contact For collaboration or inquiries, ple

ZImageTurbo 173 downloads
View public details
Workflows 2025-12-25

LongCat-Video-Avatar digital human text-to-video long video

This workflow is built to generate long, audio-driven videos of a digital avatar using the LongCat-Avatar model. Its core function is to synchronize a character's lip movements and facial expressions with a provided audio track. The system processes the video in sequential, overlapping chunks, allowing it to maintain consistency and create extended, seamless animations from a single reference image. In practice, the workflow takes a reference image and an audio file as input. It uses an audio processing pipeline to create motion embeddings that drive the avatar's performance. The "long video" capability is handled by an iterative process where the end of one generated segment is used as the starting point for the next, ensuring smooth transitions and making it effective for producing continuous, long-form talking avatar content. 🎥 YouTube Video Tutorial Want to know what this workflow actually does and how to start fast? This video explains what the tool is, how to launch the workflow instantly, and shares my core design logic — no local setup, no complicated environment. Everything starts directly on RunningHub, so you can experience it in action first. 👉 YouTube Tutorial: https://youtu.be/nga34VtsZuA Before you begin, I recommend watching the video thoroughly — getting the full context helps you understand the tool faster and avoid common detours. ⚙️ RunningHub Workflow Try the workflow online right now — no installation required. 👉 Workflow: https://www.runninghub.ai/post/2003091459949699074/?inviteCode=rh-v1111 If the results meet your expectations, you can later deploy it locally for customization. 🎁 Fan Benefits: Register to get 1000 points + daily login 100 points — enjoy 4090 performance and 48 GB super power! 📺 Bilibili Updates (Mainland China & Asia-Pacific) If you’re in the Asia-Pacific region, you can watch the video below to see the workflow demonstration and creative breakdown. 📺 Bilibili Video: https://www.bilibili.com/video/BV1H5BsBeEgx/ ☕ Support Me on Ko-fi If you find my content helpful and want to support future creations, you can buy me a coffee ☕. Every bit of support helps me keep creating — just like a spark that can ignite a blazing flame. 👉 Ko-fi: https://ko-fi.com/aiksk 💼 Business Contact For collaboration or inquiries, please contact aiksk95 on WeChat. 🎥 YouTube 视频教程 想了解这个工作流到底是怎样的工具,以及如何快速启动?视频主要介绍工具定位、快速启动方

Wan Video 14B i2v 720p 149 downloads
View public details
Z-image ControlNet 2.1 High/Low Noise Rendering + SeedVR2 200-Megapixel
Workflows 2025-12-25

Z-image ControlNet 2.1 High/Low Noise Rendering + SeedVR2 200-Megapixel

This workflow uses a two-pass, high-and-low noise process to balance Z-Image Turbo's rendering quality with the structural control of ControlNet 2.1. The initial high-noise stage uses ControlNet to lock in the core composition and pose. The second low-noise stage then bypasses ControlNet, allowing the model to refine details and textures without strict structural constraints, achieving a blend of control and aesthetic quality. Designed for flexibility, the pipeline includes switches to alternate between text-to-image and image-to-image generation, or to apply LoRAs during the refinement pass. After an optional face detailing stage, it provides two distinct upscaling methods: a creative, tiled diffusion upscaler (TTP) and the SeedVR2 model, which produces a more faithful, megapixel-scale enlargement. 🎥 YouTube Video Tutorial Want to know what this workflow actually does and how to start fast? This video explains what the tool is, how to launch the workflow instantly, and shares my core design logic — no local setup, no complicated environment. Everything starts directly on RunningHub, so you can experience it in action first. 👉 YouTube Tutorial: https://youtu.be/VHBlv7DdldA Before you begin, I recommend watching the video thoroughly — getting the full context helps you understand the tool faster and avoid common detours. ⚙️ RunningHub Workflow Try the workflow online right now — no installation required. 👉 Workflow: https://www.runninghub.ai/post/2001611142990577666/?inviteCode=rh-v1111 If the results meet your expectations, you can later deploy it locally for customization. 🎁 Fan Benefits: Register to get 1000 points + daily login 100 points — enjoy 4090 performance and 48 GB super power! 📺 Bilibili Updates (Mainland China & Asia-Pacific) If you’re in the Asia-Pacific region, you can watch the video below to see the workflow demonstration and creative breakdown. 📺 Bilibili Video: https://www.bilibili.com/video/BV1EUqHBSEv6/ ☕ Support Me on Ko-fi If you find my content helpful and want to support future creations, you can buy me a coffee ☕. Every bit of support helps me keep creating — just like a spark that can ignite a blazing flame. 👉 Ko-fi: https://ko-fi.com/aiksk 💼 Business Contact: For collaboration or inquiries, please contact aiksk95 on WeChat. 🎥 YouTube 视频教程 想了解这个工作流到底是怎样的工具,以及如何快速启动?视频主要介绍工具定位、快速启动方法和我的构筑思路。我们会直接在 RunningHub 上进行演示

ZImageTurbo 118 downloads
View public details
Z-Image × ControlNet 2.1 second-order Refiner enhancement technique: LoRA character replacement
Workflows 2025-12-25

Z-Image × ControlNet 2.1 second-order Refiner enhancement technique: LoRA character replacement

This workflow is an updated local inpainting process for the Z-Image model, designed to improve character consistency in extreme scenarios, such as when a face is very small in the frame. It employs a two-pass, high-and-low noise rendering technique. The first pass uses a LoRA with low weight to establish the basic character features, while the second pass applies the LoRA at full strength to accurately restore the face and details. The workflow also uses ControlNet with a pose model like SD-Pose for better structural guidance. Separate prompts can be used for each pass: the first to blend the inpainted area with the scene, and the second to focus on character-specific details using LoRA trigger words. This method offers more precise control over local edits than simpler models, ensuring better integration and higher fidelity. 🎥 YouTube Video Tutorial Want to know what this workflow actually does and how to start fast? This video explains what the tool is, how to launch the workflow instantly, and shares my core design logic — no local setup, no complicated environment. Everything starts directly on RunningHub, so you can experience it in action first. 👉 YouTube Tutorial: https://youtu.be/A4Vc5wAxNCg Before you begin, I recommend watching the video thoroughly — getting the full context helps you understand the tool faster and avoid common detours. ⚙️ RunningHub Workflow Try the workflow online right now — no installation required. 👉 Workflow: https://www.runninghub.ai/post/2002219399727726593/?inviteCode=rh-v1111 If the results meet your expectations, you can later deploy it locally for customization. 🎁 Fan Benefits: Register to get 1000 points + daily login 100 points — enjoy 4090 performance and 48 GB super power! 📺 Bilibili Updates (Mainland China & Asia-Pacific) If you’re in the Asia-Pacific region, you can watch the video below to see the workflow demonstration and creative breakdown. 📺 Bilibili Video: https://www.bilibili.com/video/BV11KqzBGEuh/ ☕ Support Me on Ko-fi If you find my content helpful and want to support future creations, you can buy me a coffee ☕. Every bit of support helps me keep creating — just like a spark that can ignite a blazing flame. 👉 Ko-fi: https://ko-fi.com/aiksk 💼 Business Contact: For collaboration or inquiries, please contact aiksk95 on WeChat. 🎥 YouTube 视频教程 想了解这个工作流到底是怎样的工具,以及如何快速启动?视频主要介绍工具定位、快速启动方法和我的

ZImageTurbo 141 downloads
View public details
Z-image ControlNet 2.0 Local Inpainting
Workflows 2025-12-17

Z-image ControlNet 2.0 Local Inpainting

This workflow's core is leveraging ControlNet 2.0's precision to perform local inpainting on a realistic model. Its principle is to use Canny edge detection and an Inpaint preprocessor to lock and protect the structure of the non-target areas, while the AI creatively fills only within the masked region based on the text prompt. This dual-constraint system ensures the new content blends seamlessly with the original image and grants the user exact control over localized details. In practice, you just upload the source image and use the "MaskEditor" to paint over the area you wish to change. Then, describe the desired new content in the prompt box. The workflow automates all subsequent steps, from edge detection to final compositing, allowing you to easily replace or enhance any element as if with a paintbrush, while maintaining photorealistic quality. 🎥 YouTube Video Tutorial Want to know what this workflow actually does and how to start fast? This video explains what the tool is, how to launch the workflow instantly, and shares my core design logic — no local setup, no complicated environment. Everything starts directly on RunningHub, so you can experience it in action first. 👉 YouTube Tutorial: https://youtu.be/H7d8-6FYQv0 Before you begin, I recommend watching the video thoroughly — getting the full context helps you understand the tool faster and avoid common detours. ⚙️ RunningHub Workflow Try the workflow online right now — no installation required. 👉 Workflow: https://www.runninghub.ai/post/2000809405283266562/?inviteCode=rh-v1111 If the results meet your expectations, you can later deploy it locally for customization. 🎁 Fan Benefits: Register to get 1000 points + daily login 100 points — enjoy 4090 performance and 48 GB super power! 📺 Bilibili Updates (Mainland China & Asia-Pacific) If you’re in the Asia-Pacific region, you can watch the video below to see the workflow demonstration and creative breakdown. 📺 Bilibili Video: https://www.bilibili.com/video/BV1d5qYBkE5B/ ☕ Support Me on Ko-fi If you find my content helpful and want to support future creations, you can buy me a coffee ☕. Every bit of support helps me keep creating — just like a spark that can ignite a blazing flame. 👉 Ko-fi: https://ko-fi.com/aiksk 💼 Business Contact For collaboration or inquiries, please contact aiksk95 on WeChat. 🎥 YouTube 视频教程

ZImageTurbo 660 downloads
View public details
Zaoxiang ControlNet 2.0 High/Low Noise Rendering + SeedVR2 200-Megapixel
Workflows 2025-12-17

Zaoxiang ControlNet 2.0 High/Low Noise Rendering + SeedVR2 200-Megapixel

This workflow utilizes a two-pass, high-and-low noise rendering process to balance structural control from ControlNet 2.0 with the aesthetic quality of the Z-Image model. The high-noise pass establishes the core composition and pose using ControlNet's guidance, while the subsequent low-noise pass bypasses it to refine details, color, and visual style without strict structural constraints. The pipeline is versatile, supporting both text-to-image and image-to-image tasks, and incorporates a face detailing stage for portrait enhancement. For final output, it offers two distinct upscaling methods: a standard diffusion-based tiled upscaler for creative detail, and the SeedVR model for a more faithful, megapixel-scale enlargement that better preserves the original character of the image. 🎥 YouTube Video Tutorial Want to know what this workflow actually does and how to start fast? This video explains what the tool is, how to launch the workflow instantly, and shares my core design logic — no local setup, no complicated environment. Everything starts directly on RunningHub, so you can experience it in action first. 👉 YouTube Tutorial: https://youtu.be/H7d8-6FYQv0 Before you begin, I recommend watching the video thoroughly — getting the full context helps you understand the tool faster and avoid common detours. ⚙️ RunningHub Workflow Try the workflow online right now — no installation required. 👉 Workflow: https://www.runninghub.ai/post/2000807895858020353/?inviteCode=rh-v1111 If the results meet your expectations, you can later deploy it locally for customization. 🎁 Fan Benefits: Register to get 1000 points + daily login 100 points — enjoy 4090 performance and 48 GB super power! 📺 Bilibili Updates (Mainland China & Asia-Pacific) If you’re in the Asia-Pacific region, you can watch the video below to see the workflow demonstration and creative breakdown. 📺 Bilibili Video: https://www.bilibili.com/video/BV1d5qYBkE5B/ ☕ Support Me on Ko-fi If you find my content helpful and want to support future creations, you can buy me a coffee ☕. Every bit of support helps me keep creating — just like a spark that can ignite a blazing flame. 👉 Ko-fi: https://ko-fi.com/aiksk 💼 Business Contact For collaboration or inquiries, please contact aiksk95 on WeChat. 🎥 YouTube 视频教程 想了解这个工作流到底是怎样的工具,以及如何快速启动? 视频主要介绍 工具定位、启动方式 以及 整体构建逻辑 。 我们会直接在 Runni

ZImageTurbo 199 downloads
View public details
LanPaint - Z-Image local redrawing
Workflows 2025-12-14

LanPaint - Z-Image local redrawing

This workflow leverages LanPaint for localized image inpainting, enhancing the Z-Image model's capability for image editing . While the base model has limited inpainting features, LanPaint significantly improves this by allowing precise masking and re-rendering of specific areas. The workflow enables users to adjust latent noise , ensuring that only selected portions of an image, such as backgrounds or details, are modified while preserving the integrity of the rest. In practice, this method is effective for stylized edits , such as replacing parts of characters or adjusting intricate details (e.g., head or clothing replacements). It’s particularly useful for applications like character customization or background replacement in artistic or abstract content . The system supports image resizing , masking , and proportion constraints to prevent distortions, ensuring that the final image remains clean and consistent. 🎥 YouTube Video Tutorial Want to know what this workflow actually does and how to start fast? This video explains what the tool is, how to launch the workflow instantly, and shares my core design logic — no local setup, no complicated environment. Everything starts directly on RunningHub, so you can experience it in action first. 👉 YouTube Tutorial: https://youtu.be/jLgtxPpjjWo Before you begin, I recommend watching the video thoroughly — getting the full context helps you understand the tool faster and avoid common detours. ⚙️ RunningHub Workflow Try the workflow online right now — no installation required. 👉 Workflow: https://www.runninghub.ai/post/1999383692797767682/?inviteCode=rh-v1111 If the results meet your expectations, you can later deploy it locally for customization. 🎁 Fan Benefits: Register to get 1000 points + daily login 100 points — enjoy 4090 performance and 48 GB super power! 📺 Bilibili Updates (Mainland China & Asia-Pacific) If you’re in the Asia-Pacific region, you can watch the video below to see the workflow demonstration and creative breakdown. 📺 Bilibili Video: https://www.bilibili.com/video/av115706519688567/ ☕ Support Me on Ko-fi If you find my content helpful and want to support future creations, you can buy me a coffee ☕。 Every bit of support helps me keep creating — just like a spark that can ignite a blazing flame。 👉 Ko-fi: https://ko-fi.com/aiksk 💼 Business Contact For collabora

ZImageTurbo 126 downloads
View public details